Tusk RZR Automatic Cam Chain Tensioner
Tusk RZR Automatic Cam Chain TensionerPart#1840530001Thank you for purchasing the Tusk automatic cam chain tensioner.It will be a great addition to your Polaris RZR side x side.ContentsVehicle Fitment1– Tusk billet aluminum adapter2014-2016 Polaris RZR 1000 XP1– Tusk tensioner push rod2014-2016 Polaris RZR-4 1000 XP2– M6 x 1.0 x 25mm hex flange bolt with 8mm head2015-2016 Polaris RZR 900 Trail1-Squash washer2016 Polaris RZR 1000/900 S (60”)1-Chain tensioner1-O-ring gasket1-Chain tensioner gasket1-M6 Flange BoltTusk tensioner push rod (1)Tusk billet adapter (1)M6 x 1.0 x 25mm Hex bolt (2)Squash Washer (1)Chain tensioner (1)M6 Flange bolt (1)Chain tensioner gasket (1)O-ring gasket (1)
Tusk RZR Automatic Cam Chain TensionerPart#1840530001Product DescriptionThe hydraulic OEM tensioner on your Polaris RZR has been know to function improperly at start upor even fail under normal operating conditions. The Tusk cam chain tensioner is designed to reduceor eliminate the knocking noise on your RZR at start up. This product is intended to be a preventative maintenance item that should be installed prior to excessive wear or failure of your cam chainand its components. This product is not the solution for all cam and valve train issues.Installation Instructions1. Read these instructions thoroughly from start to finish before starting. If you do not feel that youare capable of performing this installation, take this product and your machine to a qualified mechanic.2. Remove your key from your machine to prevent anyone from starting it during this procedure.3. Remove your clutch cover on the LH side of your machine so you can use the clutch to manuallyrotate your motor. See image #1 Remove the oil filler cap on the top of your valve cover andtake note of the position of the cam lobe. See image #2.4. Rotate your clutch counter clockwise until the cam lobe is pointing upward. (Do not rotate yourclutch clockwise) This will insure that all cam lobes will have no pressure on the valve springs andthis will allow you to properly install your new Tusk Cam Chain Tensioner. See images #1 & 2Image #1Image #2Cam Lobe
Tusk RZR Automatic Cam Chain TensionerPart#1840530001Installation5. On the right hand side of your motor locate the OEM cam chain tensioner and remove it usinga 1-1/16” or 27mm end wrench. Placing a clean rag under the opening will help catch any excessoil. See images 3 & 4. DO NOT ROTATE THE MOTOR AFTER THE TENSIONER IS REMOVEDImage #3Image #4OEM Cam Chain Tensioner6. Confirm that tensioner is in full closed position. Locate the supplied cam chain tensionerand a small flat screwdriver. With a pair of pliers remove the small key in the end of the tensioner, this will allow the tensioner foot to extend to full open position.Remove tensioner keyTensioner in full open position7. Insert your small flat screw driver in the end of the tensioner and turn clock wise until thetension is in full closed position. Hold the tensioner closed and re-insert the previously removedkey. See image #4Image #4Tensioner in full closed position
Tusk RZR Automatic Cam Chain TensionerPart#18405300018. Locate the supplied chain tensioner gasket, Tusk billet adapter and assemble using the supplied M6 flange bolts. See image #5.Chain tensioner gasketImage #5Tusk billet adapterChain tensioner in closed position9. Locate the supplied squash washer and install in on the end of the Tusk billet adapter asshown in image #6. Make sure the washer stays in place when installing. Applying a smallamount of light duty grease may help hold it in place.10. Locate the supplied Tusk push rod and install it in the end of the Tusk billet adapter asshown in image #7. The push rod will extend out from the end of the adapter by about 1/16”1/8”.Apply grease hereImage #7Squash WasherTusk push rodImage #6Protrude out 1/16”-1/8”11. Carefully thread the assembly part into the machine. Use your 1-1/16” or 27mm wrench to tighten.(This part is aluminum do not over tighten).
Tusk RZR Automatic Cam Chain TensionerPart#184053000112. Using your pliers removetensioner key. Image #813. Using your small flat screwdriver rotatethe tensioner clockwise until it stops andrelease. The tensioner will spring backcounter-clockwise. Image #9Image #8Image #9Note: Tensioner may lock in full closed position if too much tension is applied.Turn clockwise14. Tighten (2) M6 x 1.0 x 25mm flangebolts.Tighten bolts15. Final Step. Install the supplied O-ringinto the tensioner and install suppled M6flange bolt and tighten. image #10.Image #10
2014-2016 Polaris RZR 1000 XP 2014-2016 Polaris RZR-4 1000 XP 2015-2016 Polaris RZR 900 Trail 2016 Polaris RZR 1000/900 S (60”) Chain tensioner gasket (1)M6 Flange bolt (1) O-ring gasket (1) Squash Washer (1) M6 x 1.0 x 25mm Hex bolt (2) Tusk billet adapter (1) Tusk tensioner push rod (1)
polaris northstar coolers 72 cockpit & mirrors 74 winches 76 additional accessories & 570 78 . casualwear 96 camo & gifts 103 2020 rzr s 1000 2021 lineup rzr xp 1000 rzr 570 rzr xp 4 1000 rzr turbo s rzr pro xp youth p. 79 wide open turbo s p. 22 xtreme performance pro xp p. 04 xp 1000 p. 22 s 1000 &
2016 and up RZR XP/XP4 Turbo(4) Mounting Screws Installaton Guide Installation 2014 and up RZR XP/XP4 1000 *2015 and up RZR XP/XP4 900 * Must purchase storage pocket from Polaris for a 2014 and up RZR XP/XP4 1000 to utilize this dash kit on 2015 and up RZR XP/XP4 900 models. Step 1 - Remove Hood
initial efforts end in failure so he drafts in Shaun and the gang to help out. 6:40pm Andy's Aquatic Adventures: Andy and the Tusk Fish (CC,Repeat,G) Andy boards his safari-sub to search for some tusk fish. Suddenly, a tusk fish appears amongst the coral, and on seeing its enormous teeth, Andy knows instantly how they got their name!
PMX-2 RZR Wire Kit. This manual will illustrate the installation process with a 2016 Polaris RZR XP4 Turbo. If you feel unsure about installing this system yourself, have it installed by a qualified technician. Before installation, disconnect the battery negative (-) terminal to prevent damage to the unit, fire and/or possible injury.
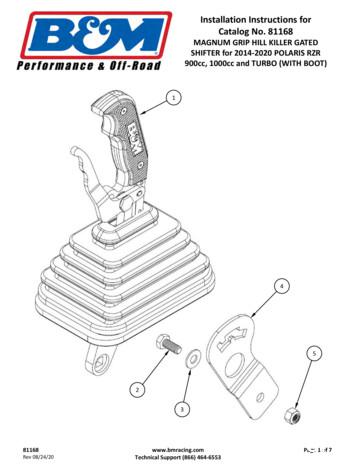
SHIFTER for 2014-2020 POLARIS RZR 900cc, 1000cc and TURBO (WITH BOOT) . PIVOT SLEEVE, MAG GRIP GATED SHFTR POLARIS RZR, LATE 1. 4001497 SPRING, SELECTOR POLARIS RZR: 1 3401537 . owner or maintenance manual. CABLE ADJUSTMENT. 23.Secure the console with the five plastic push
Installation manual Polaris RZR Front Bumper Product number: SXFB-1150 Application: 14 polaris RZR 1000 XP, & S . A message from the owner Fab Fours’ was born out of a passion for customizing vehicles and a love of the outdoors. Our . NOTE: 2014-2018 Year Models Figure 3 Figure 2. 4. If installing a winch, do so now per the
RZR XP 900 spring/shock installation Thank you for purchasing the Shock Therapy Dual Rate Spring Kit for your RZR 900. Your item list: 2 Front upper coil springs, 2 Front lower coil springs, 2 Rear upper springs, 2 Rear lower springs, 4 nylon spring dividers, 4 Silent cross over rings, 4 cross over ring O-
Geburtstagskolloquium Reinhard Krause-Rehberg Andreas Wagner I Institute of Radiation Physics I www.hzdr.de Member of the Helmholtz AssociationPage Positrons slow down to thermal energies in 3-10 ps. After diffusing inside the matter positrons are trapped in vacancies or defects. Kinetics results in trapping rates about


