Tutorial Weebly - PRESENTACIÓN
TUTORIAL WEEBLYCreado por:Andrea Cerdas Moya1
INGRESARA la página: http://www.weebly.com y llene los datos queaparecen en el formulario Regístrese gratuitamente.2
PÁGINA WEB, BLOG O TIENDAUna vez realizado el paso anterior seleccionamos una delas tres opciones que aparecen para empezar nuestroproyecto.3
ESCOGEMOS UN TEMASeleccionamos el formato que más nos llame la atenciónpara realizar nuestra página o blog y le damos click en elbotón Elegir.4
ESCOGEMOS EL NOMBRE DEL SITIO WEBSe presenta un formulario para rellenar con el nombre que llevará nuestro sitio web.Como nuestra cuenta es gratuita seleccionaremos la opción que aparece en la siguienteimagen. Si el nombre está disponible aparecerá el recuadro en color verde. Le damos clicken continuar cuando estemos listos.5
BIENVENIDO A WEEBLY Después del paso anterior lapágina nos muestr a elsiguiente video de Bienvenida.Si necesitamos un poco másde or ientación sobre laherramienta podemos darclick en la pantalla azul paraver el vídeo. De lo contrario,selecciono el botón deConstruir mi sitio paraempezar a editar la plantillaque escogí anteriormente.6
EDITAR PÁGINAEmpezamos a construir nuestra página web basándonos en el diseñoelegido previamente. La página debe verse de la siguiente forma:7
Para modificar la imagen que aparece en nuestra Página de Inicio oPrincipal le damos click sobre la misma y debe aparecer el siguientebotón para editar.8
Aparecerá la siguiente pantalla. En ella seleccionaremos el sitio donde seencuentra nuestra imagen, ya sea en nuestra computadora o en internetLe damos click en el botón de color verde para buscar la imagenen nuestra computadora.9
Una vez seleccionada la imagen, le damos un click sobre ella para seleccionarla.La misma debe aparecer en nuestra página web de la siguiente manera:La imagen habilita una barra para modificar la imagen. Una vez modificada,seleccionamos el botón OK, el cual aparece dentro de la imagen.10
También podemos agregar imágenes desde internet sin necesidad dedescargarlas a la computadora, únicamente necesitamos la dirección delsitio donde se encuentra en la web y presionar luego el botón de Insertar.
MODIFICAR FORMATO DE PÁGINASEN NUESTRO PROYECTOCon Weebly tenemos la ventaja de modificar nuestro proyecto fácilmente. Si lo que necesitamos es borrar,crear una página nueva o cambiar el formato ya existente lo podemos hacer al seleccionar la pestaña Páginas.12
MODIFICAR DISEÑO DE LA PÁGINA Muestra las opciones paracambiar el color, tema yfuentes del proyecto. Siempre que realizamos uncambio en el for matodebemos darle click en elbotón Guardar, ya que elsistema no lo haceautomáticamente13
MODIFICAR OPCIONES DE CONSTRUIR Esta opción nos presenta lasher r amientas multimedia, deestructura, básica, comercial y otraspara la inserción de elementos quecomplementen el trabajos querealizamos. Para agregar cualquier elemento alescenario de nuestro trabajo, loque debemos hacer es seleccionarla herramienta y arrastrarla hacia ellugar donde queremos agregarla.14
15
PUBLICARAl finalizar nuestra página web creada en la herramienta Weebly procederemos aPublicar su contenido. Es por ello que le daremos click al botón llamado Publicar.16
Puede revisar el sitio web de referencia:www.tecnoeducativa1.weebly.com
Con Weebly tenemos la ventaja de modificar nuestro proyecto fácilmente. Si lo que necesitamos es borrar, crear una página nueva o cambiar el formato ya existente lo podemos hacer al seleccionar la pestaña Páginas. 12
Tutorial Process The AVID tutorial process has been divided into three partsÑ before the tutorial, during the tutorial and after the tutorial. These three parts provide a framework for the 10 steps that need to take place to create effective, rigorous and collaborative tutorials. Read and note the key components of each step of the tutorial .
Tutorial Process The AVID tutorial process has been divided into three partsÑ before the tutorial, during the tutorial and after the tutorial. These three parts provide a framework for the 10 steps that need to take place to create effective, rigorous and collaborative tutorials. Read and note the key components of each step of the tutorial .
Tutorial 1: Basic Concepts 10 Tutorial 1: Basic Concepts The goal of this tutorial is to provide you with a quick but successful experience creating and streaming a presentation using Wirecast. This tutorial requires that you open the tutorial document in Wirecast. To do this, select Create Document for Tutorial from the Help menu in Wirecast.
Tutorial 16: Urban Planning In this tutorial Introduction Urban Planning tools Zoning Masterplanning Download items Tutorial data Tutorial pdf This tutorial describes how CityEngine can be used for typical urban planning tasks. Introduction This tutorial describes how CityEngine can be used to work for typical urban .
Tutorial 1: Basic Concepts 10 Tutorial 1: Basic Concepts The goal of this tutorial is to provide you with a quick but successful experience creating and streaming a presentation using Wirecast. This tutorial requires that you open the tutorial document in Wirecast. To do this, select Create Document for Tutorial from the Help menu in Wirecast.
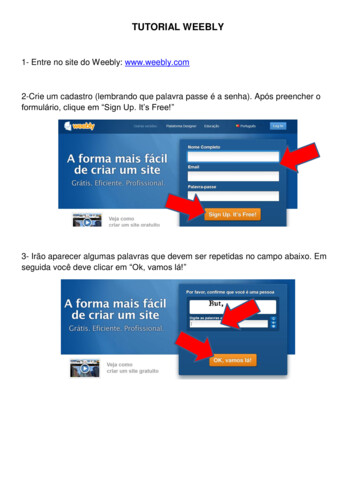
TUTORIAL WEEBLY 1- Entre no site do Weebly: www.weebly.com 2-Crie um cadastro (lembrando que palavra passe é a senha). Após preencher o formulário, clique em “Sign Up. It’s Free!” 3- Irão aparecer al
Volume 4 MIL-SMD-1553 Tutorial Volume 5 MnlsmD-1589 Tutorial Volume 6 MMI-STD-1679 Tutorial Volume 7 Mnl-SID-1750 Tutorial Volume 8 M-SD-1815 Tutorial Volume 9 Navy Case Study Tutorial PROCEEDINGS OF THE 2nd AFSC STANDARDIZATION CONFERENCE 30 NOVEMBER
Tutorial:Layout Tutorial In this tutorial you will go through creating an Inverter layout while performing design-rule checks (DRC). This tutorial assumes that you have logged in to an COE or ECE machine and are familiar with basic UNIX commands. Create Aliases to


