INVESTIGATION OF RESIDUAL STRESSES AND STRAIN IN
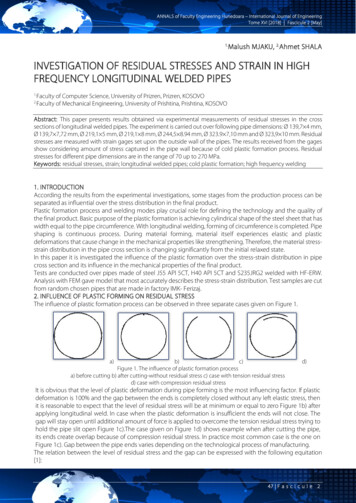
A NNALS of Faculty Engineering Hunedoara – International Journal of EngineeringTome XVI [2018] Fascicule 2 [May]1.Malush MJAKU, 2.Ahmet SHALAINVESTIGATION OF RESIDUAL STRESSES AND STRAIN IN HIGHFREQUENCY LONGITUDINAL WELDED PIPESFaculty of Computer Science, University of Prizren, Prizren, KOSOVOFaculty of Mechanical Engineering, University of Prishtina, Prishtina, KOSOVO1.2.Abstract: This paper presents results obtained via experimental measurements of residual stresses in the crosssections of longitudinal welded pipes. The experiment is carried out over following pipe dimensions: Ø 139,7 4 mm,Ø 139,7 7,72 mm, Ø 219,1 5 mm, Ø 219,1 8 mm, Ø 244,5 8.94 mm, Ø 323.9 7,10 mm and Ø 323,9 10 mm. Residualstresses are measured with strain gages set upon the outside wall of the pipes. The results received from the gagesshow considering amount of stress captured in the pipe wall because of cold plastic formation process. Residualstresses for different pipe dimensions are in the range of 70 up to 270 MPa.Keywords: residual stresses, strain; longitudinal welded pipes; cold plastic formation; high frequency welding1. INTRODUCTIONAccording the results from the experimental investigations, some stages from the production process can beseparated as influential over the stress distribution in the final product.Plastic formation process and welding modes play crucial role for defining the technology and the quality ofthe final product. Basic purpose of the plastic formation is achieving cylindrical shape of the steel sheet that haswidth equal to the pipe circumference. With longitudinal welding, forming of circumference is completed. Pipeshaping is continuous process. During material forming, material itself experiences elastic and plasticdeformations that cause change in the mechanical properties like strengthening. Therefore, the material stressstrain distribution in the pipe cross section is changing significantly from the initial relaxed state.In this paper it is investigated the influence of the plastic formation over the stress-strain distribution in pipecross section and its influence in the mechanical properties of the final product.Tests are conducted over pipes made of steel J55 API 5CT, H40 API 5CT and S235JRG2 welded with HF-ERW.Analysis with FEM gave model that most accurately describes the stress-strain distribution. Test samples are cutfrom random chosen pipes that are made in factory IMK- Ferizaj.2. INFLUENCE OF PLASTIC FORMING ON RESIDUAL STRESSThe influence of plastic formation process can be observed in three separate cases given on Figure 1.a)b)c)Figure 1. The influence of plastic formation processa) before cutting b) after cutting-without residual stress c) case with tension residual stressd) case with compression residual stressd)It is obvious that the level of plastic deformation during pipe forming is the most influencing factor. If plasticdeformation is 100% and the gap between the ends is completely closed without any left elastic stress, thenit is reasonable to expect that the level of residual stress will be at minimum or equal to zero Figure 1b) afterapplying longitudinal weld. In case when the plastic deformation is insufficient the ends will not close. Thegap will stay open until additional amount of force is applied to overcome the tension residual stress trying tohold the pipe slit open Figure 1c).The case given on Figure 1d) shows example when after cutting the pipe,its ends create overlap because of compression residual stress. In practice most common case is the one onFigure 1c). Gap between the pipe ends varies depending on the technological process of manufacturing.The relation between the level of residual stress and the gap can be expressed with the following equitation[1]:47 F a s c i c u l e 2
A NNALS of Faculty Engineering Hunedoara – International Journal of EngineeringTome XVI [2018] Fascicule 2 [May] 11 (1) DD01 (1) Circumferential (hoop) stress in tube from change in diameter where and are the initial and final diameters,respectively Figure 2.σ E t 1 1 σ E t D0 x D 0 π 𝜎𝜎𝜀𝜀 𝐸𝐸(2)(3)Figure 2, shows Circumferential stress in tube from netopening displacement x.3. EXPERIMENT CONCEPT - METHOD FOR MEASURINGRESIDUAL STRESSESFor the experiment purposes, a method of saw cut ringsamples from test pipes and slitting them on one side wasperformed. This is shown in Figure 3a and b.After rings were slashed on one side, it was evident that theystarted to relax and create gap between the ends shown in Figure 2. Determination of residual stresses in thinFigure 1b. The gap varied according to the pipe dimensions,walled tube by deflection methods.Circumferential stress. t, thickness; D0, initialwall thickness, type of material and its strengthening leveldiameter; D1, diam. after slitting; x, net openingduring the cold plastic formation process.displacement.Before starting the measurements of the stresses with straingages, dimensions of the opened rings were once more precisely measured. Investigations were done withhelp of universal testing machine WPM ZDM10 shown on Figure 4. By increasing the force step by step, openrings were pressed until both ends touch each other and close the gap. Open ring is used as initial zero stressstate. The difference between open and closed state of the ring is giving the residual stress captured inside thepipe Figure 5a and b. Location of the strain gage on the ring surface is shown on Figure 3c.Figure 3a. Saw cut rings samples from pipe productsFigure 3b. Slitting pipe rings from one sideFigure 3c. Location of the strain gage on rings surfaceThe experiment was done at the Faculty of Mechanical Engineering in Skopje, Laboratory for testing materials.It is important to notice that in order to isolate the influence of residual stresses caused by welding, severalexperiments were done where pipe ring was sliced opposite on the weld side. The deformation was the sameas if the ring was sliced in the weld length. This clearly shows that the heat treatment applied on the weld afterpipe is welded is restoring heat affected zone to initial relaxed state.48 F a s c i c u l e 2
A NNALS of Faculty Engineering Hunedoara – International Journal of EngineeringTome XVI [2018] Fascicule 2 [May]Figure 4. Universal testing machine WPM ZDM10Figure 5a. Rings before force is appliedFigure 5b. Ring after force is applied to cause gap closingSample No. 1Material qualityJ-55, H40, E 2.x105 [MPa]Production standardØ 139.7 7.72 mmØ 244.5 8.94 mmNumber of .38447.53447.57444.89785.66789.89778.38t [mm]8.007.998.007.999.359.459.42b [mm]61606061615861Openings 7.53472.5423ε [µε]σ [MPa]168.55160143.5214193.5094.5084.64Average value ε 752 [µε]Average value ε 506 [µε]Average value σ 153 [MPa]Average value σ 101 e No.2Material qualityS 235 JRG2, RST 37-2, E 2x10⁵ [MPa]Production StandardEN 10025, DIN 17100Standard DimensionsØ 323.9 7.10 [mm]Ø 323.9 10 [mm]Number of [mm]1034.810361033.41034.31037.41033.81031.3t [mm]7.77.477.076.9910.3310.3710.35b [mm]63.7716966.2606060Openings .61323591.58484.58416.66ε [µε]σ [MPa]8277.3365.7264.60118.2796.9183.33Average value ε 362 [µε]Average value ε 506 [µε]Average value σ 72 [MPa]Average value σ 101 .2349 F a s c i c u l e 2
A NNALS of Faculty Engineering Hunedoara – International Journal of EngineeringTome XVI [2018] Fascicule 2 [May]Sample No.3S 235 JRG2, RST 37-2, E 2x10⁵ [MPa]EN 10025, DIN 17100Ø 219.1 8 03842.6544.841.80Average value ε 209 [µε]Average value σ 41.8 [MPa]Table 1. Measured residual stress in the ring samplesRing wall thickness t Diameter of openStrainForce for closing the Gap StressWidth of the(mm)ring D (mm)Gages SGopen ring (N)(mm) (Mpa )ring 810.3 9.5251.01169181414.0 1214.0 228.261.07.7329.065239217.8 130.463.77.5329.353239216.1 6.3 103.466.210.3329.8816132417.4 163.260.010.4328.6760122615.8 152.060.010.3327.871298113.3 142.460.0Material qualityProduction StandardStandard DimensionsØ 219.1 5 [mm]Number of 1.25t [mm]5.325.425.10b [mm]606061Openings [mm]9.469.167.56ε [µε]3203222506464.4550σ [MPa]Average value ε 292 [µε]Average value σ 58.5 [MPa]Ringdesignation139.7 - 1M139.7 - 2M139.7 - 3V139.7 - 4V139.7 - 1V139.7 - 2V139.7 - 3M139.7 - 4M219.1 - 1M219.1 - 2M219.1 - 3V219.1 - 4V219.1 - 5V219.1 - 6V219.1 - 7M219.1 - 8M244.5 - 1V244.5 - 2M244.5 - 3V244.5 - 4M323.9 - 1M323.9 - 2M323.9 - 3V323.9 - 4V323.9 - 5V323.9 - 6V323.9 - 7M4. CONCLUSIONSAs final conclusions following statements can be given regarding residual stresses in cold formed longitudinalwelded pipes:» The cross sections of the cold formed pipes contain captured stresses which are result of deformation andshaping of the plain sheet metal.» This stresses can be measured and they are significant.» Based on the results obtained from the theoretical and experimental work, the relation between residualstresses and level of deformation is clearly defined.» The nature of the residual stresses is clearly from tension character which is easy to understand fromopened rings.» Residual stresses are in the range of 70 to 270 MPa which is shown in the Table 1.» The presence of residual stresses can be from significant meaning for applications where pipes are usedas constructive load bearing element, or pipes for drilling, which affects their strength.50 F a s c i c u l e 2
A NNALS of Faculty Engineering Hunedoara – International Journal of EngineeringTome XVI [2018] Fascicule 2 [May]Residual stresses and deformations are larger in sections with smaller diameter opposite to bigger ones;first one experience more deformation that is causing deformation strengthening.» The mechanical properties of the plain sheet metal before and after pipe formations are different for thelongitudinal and transversal direction. Yield and UT Strength are bigger in the transversal direction thanin longitudinal.» It is clear that mechanical properties of the plain sheet metal before and after pipe formation are generallydifferent. Yield and UT Strength is increasing in both transversal and longitudinal direction after formationprocess. Pipes that have smaller diameter have bigger Yield and UT Strength and smaller elongation thanpipes with larger section. This is because of item 7.» The purpose of this paper and its results is to contribute in the general knowledge for improving thetechnology and production process of cold formed pipes.AcknowledgementsThe first author is profoundly thankful to the corresponding author Ahmet Shala (email: ahmet.shala@unipr.edu) which has paid attention to fulfill all requirements about this research work.References:[1] T. Toyooka, M. Itadani, A. Yorifuji, Development of Manufacturing ‘History’ for Producing Innovative HighFrequency Welded Steel Tubes with Excellence Properties, Kawasaki Steel Technical Report No. 47, 2002.[2] Standard, API Specification 5CT, (2000) Washington, USA.[3] Standard, ASTM-A370, (2000) Washington, USA.[4] Shanmugam, P., and Krishna Srinivas. Mechanical Behaviour of Dual Phase Steel Tubes and Its Application inAutomotive Industries. No. 2005-01-1334. SAE Technical Paper, 2005.[5] Gorni, A. A., J. H. D. Silveira, and J. S. S. Reis. "Estudo avalia o desenvolvimento de chapas de aço com grão ultrafino." Corte e Conformação de Metais 3, no. 27 (2007): 78-105.[6] Weng, Yuqing, ed. Ultra-fine grained steels. Springer Science & Business Media, 2009.[7] Sanij, MH Khani, SS Ghasemi Banadkouki, A. R. Mashreghi, and M. Moshrefifar. "The effect of single and doublequenching and tempering heat treatments on the microstructure and mechanical properties of AISI 4140steel." Materials & Design 42 (2012): 339-346.[8] Dong, Han. "High performance steels: Initiative and practice." Science China Technological Sciences 55, no. 7(2012): 1774-1790.[9] Preethi, M., B. S. Murty, S. Ganesh Sundara Raman, and R. Natarajan. "Control of UFG microstructure in weldedcarbon steel tubes by cold drawing and annealing." Transactions of the indian institute of metals 67, no. 5(2014): 681-690.[10] Razmpoosh, M. H., A. Zarei-Hanzaki, S. Heshmati-Manesh, S. M. Fatemi-Varzaneh, and A. Marandi. "The grainstructure and phase transformations of TWIP steel during friction stir processing." Journal of MaterialsEngineering and Performance 24, no. 7 (2015): 2826-2835.[11] Chen, Zejun, Huiquan Han, Wei Ren, and Guangjie Huang. "Heat transfer modeling of an annular on-line spraywater cooling process for electric-resistance-welded steel pipe." PloS one 10, no. 7 (2015): e0131574.[12] Chen, Zejun, Xin Chen, and Tianpeng Zhou. "Microstructure and Mechanical Properties of J55ERW Steel PipeProcessed by On-Line Spray Water Cooling." Metals 7, no. 4 (2017): 150.»ISSN 1584 - 2665 (printed version); ISSN 2601 - 2332 (online); ISSN-L 1584 - 2665copyright University POLITEHNICA Timisoara, Faculty of Engineering Hunedoara,5, Revolutiei, 331128, Hunedoara, ROMANIAhttp://annals.fih.upt.ro51 F a s c i c u l e 2
Material quality S 235 JRG2, RST 37-2, E 2x10⁵ [MPa] Production Standard EN 10025, DIN 17100 Number of rings 1M 2M 3V 4V 5V 6V 7M 4M D o[mm] 221.70 220 220.50 220.50 220.15 220.20 220.20 220 D 1[mm]
SHOT-PEENING RESIDUAL STRESSES ON THE FRACTURE AND CRACK GROWTH PTOPERTIES OF Unclas D6AC STEEL (NASA) 23 p HC 4.25 CSCL 20K G3/32 3435ncas-CSCL 20K G3/32 34354 . of the residual stresses to the stress intensity. For an assumed residual L-8981. stress distribution, the effect of the residual stresses explained the dis- .
WELDING RESEARCH WELDING JOURNAL 279-s ABSTRACT. Martensite start and finish temperatures are very important in struc-tural steel welding because they control the residual stresses in a weld. Tensile residual stresses amplify the effect of ap-plied tensile stress. On the other hand, compressive residual stresses are alge-
were verified with hole drilling strain gage measurements. The residual stresses were used as internal stresses in the finite element model for the torsion fatigue simulation in order to study the cycle by cycle relaxation of the residual stresses in constant amplitude torsion loading.
TWR-60352 VOL sic I PAGE fi. CORPORATION SPACE OPERATIONS well as residual stresses in the region of the frets. Assembly stresses are tensile, however, the magnitude is much less than that which would result in a concern. Residual stresses at th
steel column, the nonlinearity of the average stress-strain behavior of the cross-section is due to the presence of residual stress. Residual stresses arise as a result of the manufacturing process. When a compressive axial force is applied to a stub column (very short column), the fi bers that have compressive residual stresses will yield first.
Nov 01, 2018 · AWWA Standard C651-14 Section 4.11.3.3 Test for chlorine residual and comply with minimum chlorine residual AWWA Standard C651-14 Section 4.11.3.3 Test for chlorine residual and comply with minimum chlorine residual As applicable, comply with AWWA Standard C651-14 Test for chlorine residual and comply with minimum chlorine residualFile Size: 1MB
Three stock solutions of residual solvents in DMSO were used: Residual Solvent Revised Method 467 Class 1 (p/n 5190-0490) Residual Solvent Revised Method 467 Class 2A (p/n 5190-0492) Residual Solvent Revised Method 467 Class 2B (p/n 5190-0491) The sample preparation procedures for each of the three classes are listed below:
design of tall vessels: introduction, axial stress due to dead loads, axial stresses due to pressurs, longitudinal bending stresses due to dynamic loads, design considerations of distillation (tall) and absorption column (tower) 1. introduction 2. stresses in the shell (tall vertical vessel) 3. axial and circumferential pressure stresses


