TESA MICRO-HITE 350 / 600 / 900 TESA MICRO-HITE 350 / 600 .
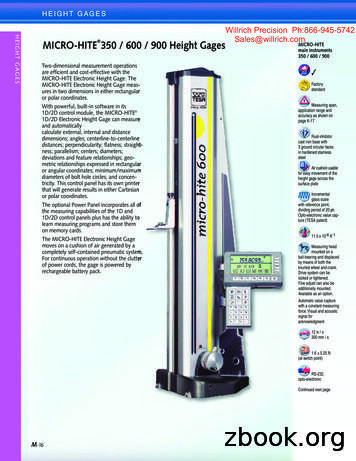
HEIGHT GAUGESTESA MICRO-HITE 350 / 600 / 900The metrology-based reference for the workshopTESA MICRO-HITE 350 /600 / 900 main gauges FactorystandardMeasuring span,application rangeand accuracy asstated on page M-12Ruggednickel platedbase withbottom face including3 resting points finelylappedAir cushion usablefor easy move ofthe height gaugeover the surface plate, if so.Frontal,model 350 7µm,model 600 9µm,model 900 11µmIncremental glassscale with referencepoint,dividing period of 20 µm.Opto-electronic value capture(TESA patent).11,5 x 10-6 K-1Probing headmounted on aball-bearing andmoved by means of bothknurled hand wheel andcrank. Head drive systemcan be locked.Fine adjust device can alsobe additionally mounted(available as an option).Automatic value capture witha constant measuring force.Visual and acoustic signal foracknowledgmentStand-alone design – Made to measure anysize in in the form of internal, external, height,depth, step and distance dimensions of geometric part features having either a flat, parallelor cylindrical surface.Automatic capture of the culmination pointon bores or shafts – Dynamic probing withmemory functions «max.», «min.» plus«max.-min.»The TESA IG-13 digital probe lets you alsomeasure any deviation from perpendicularity,straightness and parallelism as well as runouterrors with result output according toISO 1101. State-of-the-art concept associated with ahigh-quality design is the fruit of years ofexperience in the manufacture of electronicheight gauges. Ideal for dimensional inspection close to themanufacturing cell. No cumbersome cablesto clutter up the working area. Fast, simple and reliable probing of theworkpiece or holes, especially. 3 main gauges available with either a 365,615 or 920 mm measuring span. Numerical display to 0,0005, 0,001, 0,01and 0,1 mm, or equivalent inch units. Extremely accurate measuring of deviationsfrom length, straightness and perpendicularity due to the automatic correction of thebias errors through CAA (Computer AidedAccuracy). Coefficient of linear expansion identical tosteel (11,5 x 10⁻⁶ K-1).M-10300 mm/s12 in/s1,6 0,25 N(at switch pointfor value capture)RS 232,opto-electronicContinued next page POWER PANEL for value processing andoutput with interactive display to guide theoperator. No manual calculation. 99 workpiece oriented measurement cycles,programmable. Each cycle includes anumber of 64 features with related limitsof size. Built-in printer for result output or possibleuse of an external printer unit to get a hardcopy in A4 format. RS 232 data output. Every height gauge comes with a SCScalibration certificate.
HEIGHT GAUGESTESA MICRO-HITE – Efficient and PowerfulRechargeablebatteries,6 V, 3,0 Ah ormains adapter 12 hours forone battery pack; 2 hours forthe pump used to formthe air cushionOne-Dimensional Measurement10 C to 40 C–10 C to 60 C80%non-condensingIP40(IEC 60529)EN 61326-1,Class B(with disconnectedcharger)Net weight(w/o panel norbattery pack)Main gauges350: 33 kg600: 38 kg900: 45 kgTwo-Dimensional mberX0ø . A0XGXWProgramme functions for the detection of form and positionerrorswith use of a TESA IG-13 digital probe./L.A.A./L./L.ø .SCS calibrationcertificate6xYG0ATESA IG-13M-11
HEIGHT GAUGESTESA MICRO-HITE 350 / 600 / 900 Height Gauge Sets007300330073003400730035TESA MICRO-HITE height gauge setTESA MICRO-HITE height gauge setTESA MICRO-HITE height gauge set350600900Each gauge set includes the following components, control panel 01510076015200760153111111TESA MICRO-HITE 350 main gaugeTESA MICRO-HITE 600 main gaugeTESA MICRO-HITE 900 main gaugeStandard insert holderStandard insert with a 5 mm dia.tungsten carbide ball tipMaster piece for determining probe constant,nominal dimension 20,0000 mm/0.78740 inElectric pump for creating the air-cushion beneaththe gauge base, already mountedBattery packMains adapter 110 à 240 Vac/50 à 60 HzCable EU for mains adapterDust cover for TESA MICRO-HITE 350Dust cover for TESA MICRO-HITE 600Dust cover for TESA MICRO-HITE 900 Optional Accessories for TESA MICRO-HITE 350 / 600 / 9000076015704761056Add-on fine adjust device for extra fine movementof the measuring head, completeSpare battery pack No. 00760141Cable US for mains adapterFor additional accessories, report to both pages M-18 and M-25ø6ø5ø6252000760062007601435520 0,0005Technical Dataø55117,5Models72ø5000760150M-12Withstandard accessoryWith insert holderNo. 00760057With insert holderNo. S07001622350600900mmin365146152492036mminmminmmin0 5200 200 5750 220 7450 290 7700 300 8250 320 9950 390 10750 420 11300 440 13000 51Withstandard accessory(2 3 L) µm(0.0001 0.000003 L) inWithstandard accessory2δ 1 µm / 0.00005 in(L in m)(L in 3Frontal and lateral usingTESA IG-13µmin60.0002480.00031100.000397300760144
HEIGHT GAUGESPOWER PANEL Control Panel forTESA MICRO-HITE 350 / 600 / 900Dual LC display,128 x 63 mmin size. Upper display fieldfor length values(7-segment/sign).Also with symbolsfor the functions. Lower full dot displayfield for perpendicularityand straightness alongwith symbols for alloperator-controlledfunction keys.7-decade display plusminus sign forthe measured values.12,7 x 6,4 mmmain display,6,3 x 4,2 mmauxiliary display.See ction forentering agiven value.00760163Continuous displaying.Manual or automatictriggering of data transfer.Output of predefined inspection reports with headings in5 languages plus A4 formatusing an external printer unit.ViaTESAMICRO-HITETESA POWER PANELWith dedicated programme for measuring in 1 and 2 coordinate directions with geometric combination of the measured values. Lets youmeasure perpendicularity, straightness and squareness. Provides 99workpiece oriented measurement cycles including 64 features withrelated limits of size, programmable. Memory capacity for 2500 measured values. Statistical value processing (SPC). Result output via thebuilt-in matrix printer or in A4 format using an external printer unit.0,0005 / 0,001 / 0,01 / 0,1 mm0.00002 / 0.0001 / 0.001 / 0.01 / 0.1 inAccessory for TESA POWER PANEL04765008Thermal paper roll, 57 mm wideIP40(IEC 60529) M-13
HEIGHT GAUGESTESA MICRO-HITE plus M 350 / 600 / 900Speed of the manual vertical columncombined with the precisionof the motorised onea lever-type dial indicator – Check deviationsfrom straightness or parallelism accordingto ISO 1101 when used in conjunction withTESA IG-13 linked to the Power panel plus M.All TESA MICRO-HITE plus M height gaugesare unique in that they have exceptionalmetrological capabilities and can be usedintuitively with ease. The revolutionary rotarypower control combines the speed of themanual concept with the precision ofthe motorised one.With their robust and stand-alone design,these electronic height gauges are optimallysuited for use on the shop floor as in theinspection laboratory.Measure lengths in the form of internal,external, height, depth or distance dimensionsof geometrical part features having either aplane, parallel or cylindrical surface, whetherin one or two coordinate directions – Determine the position of bores in two coordinatedirections with output in both polar andCartesian (rectangular) coordinates – Mechanically adjusted at our plant based on a patentedTESA’s method used to verify the correctposition of the guiding column against thegauge base. This method allows any bias errorto be easily and quickly detected by means ofM-14 Modular design descending from thesuccessful TESA MICRO-HITE dynasty.Also equipped with the unique rotary powercontrol located close to the rugged base.This feature serves for guiding the columnthat moves on a cushion of air, commandingfast motion of the probe insert and triggering all main measuring functions. Its intuitiveuse allows accurate, easy handling of thecolumn. A simple rotation causes the measuring head to move rapidly, approach thecontact point quickly or slowly, probe upward or downward or execute boremeasurement. Available in three sizes with measuring spanof 365, 615 or 920 mm. Choice of three control panels for valueprocessing and output. Metric and inch LC display with a resolutionto 0,0001 and 0,001 mm, or inch equivalent. Autonomous run through batteries. Nocumbersome cable. Built-in air bearing for easy displacementover the surface plate. Motorised measuring head for fast, accurateprobing at each contact point with aconstant measuring force. TESA µ system for matchless reliability andsimplicity. High precision through CAA (ComputerAided Accuracy). All correction values storedin the memory still add to the mechanicalprecision. Coefficient of linear expansion matchingthat of steel (11,5 x 10⁻⁶ K-1). RS 232 data output. SCS calibration certificate delivered withevery height gauge.TESA MICRO-HITE plus Mmain heiht gauges350 / 600 / 900 FactorystandardMeasuring span,application rangeand accuracy asstated on page M-16Rugged nickelplated gaugebase having3 resting points, finelylappedBuilt-in air-bearingfor easy moveof the columnover the surface plateFrontal,for models350 5 µm600 7 µm900 9 µmIncrementalglass scale withdatum point,20 µm grating division .Opto-electronic dataacquisition (TESA patent).Measuring headmounted on aball-bearing.Motorised head displacementat a varying speed from 7,5up to 40 mm/s.Manual displacement: 600 mm/s.Automatic value capturewith a constant measuringforce.11,5 x 10-6 K-11 N Coupledservomotorfor activatingthe measuring forceContinued next page
HEIGHT GAUGESRechargeablebatteries 6 V,3,0 Ah ormains adapter 110 to240 Vac/50 to 60 Hz 12 hours afterfull recharging(8 hours)10 C to 40 CTESA MICRO-HITE plus MUnrivaled Power, Performances, Ease of useMeasurement without change of the probe directionProbe constant excluded-10 C to 60 Ch3h2h4h1h3h1h2IP40(IEC 60529)EN 61326-1,Class B(with disconnectedcharger)Net weight(w/o control panelnor battery pack)main part 350 33 kg,600 38 kg, 900 45 kgh480%non-condensingMeasurement with change of the probe directionProbe constant included– Without storageof the culmination point– With storageof the culmination pointø2h2h4SCS calibrationcertificateb2h2h1h1Declarationof kagingTwo-Dimensional MeasurementYW0Y00YGTESA µ System00XXG0XWA6xø . Ausing TESATASTMeasurement of Form and Position Deviations./LDeviation inparallelismRadial ing TESA IG-13M-15
HEIGHT GAUGESTESA MICRO-HITE plus MHeight Gauge Sets 350 / 600 / 900007300630073006400730065TESA MICRO-HITE plus M height gauge setTESA MICRO-HITE plus M height gauge setTESA MICRO-HITE plus M height gauge set1D Control Panel 350600900Each gauge set includes the following components, control panel 10560076015100760152007601531111111 TESA MICRO-HITE plus M main gaugeTESA MICRO-HITE plus M main gaugeTESA MICRO-HITE plus M main gaugeStandard insert holderStandard probe insertwith a 5 mm dia. ball tipMaster piece with nominal dimension6,35 mm/0.25 inElectric pump for creating the air cushionbeneath the gauge baseBattery packMains adapter 110 to 240 Vac/50 to 60 HzCable EU for mains adapterCable US for mains adapterDust cover for Model 350Dust cover for Model 600Dust cover for Model 900 Keypad with20 softkeys See opposite Optional Accessories for TESA MICRO-HITE plus M 350 / 600 / 90000760157Spare battery for battery pack No. 00760141For additional accessories, report to both pages M-18 and M-256,359 ø 29,9 onfor enteringa given value.Acoustic signal.Choice of 7 languagesfor report headings.RS 232, optoelectronic andbidirectionalViaTESA MICRO-HITEplus MIP50(IEC 60529)ø 500076021900760062ø62555Technical Data20ModelsWithstandard accessoryWith insert holderNo. 00760057With insert holderNo. S07001622M-16LC display,67 x 33 mmin size.3-line display (alphanumeric)plus symbols.7-decade display plusminus sign for the measuredvalues.7 or 4 signs for both auxiliarydisplays 1 and 2.10 x 4,9 mm(measuredvalues).7,5 x 3,7 or 5 x 2,5 mm(display 1 or 2).350600900mmin365146152492036mminmminmmin0 5200 200 5750 220 7450 290 7700 300 8250 320 9950 390 10750 420 11300 440 13000 51Withstandard accessory(2 1,5 L) µm(0.0001 0.0000015 L) inWithstandard accessoryon flat surfaces :2δ 0,5 µm – 0.000025 ininside bores :2δ 1 µm– 0.00005 inFrontal, mechanicalFrontal and lateral using TESA IG-1300760143µmin50.0002070.00028(L in m)(L in in)90.00035Declarationof conformity
HEIGHT GAUGESPOWER PANEL plus M Control Panels forTESA MICRO-HITE plus M 350 / 600 / 900LC dual display,128 x 63 mmin size. Length measurement:7-segment/digit upperdisplay field for values plussymbols for the functions. Straightness or perpendicularity measurement:display field for values plussymbols (function keys).Operator controlled operations (full dot display).Measured values:7-decade display plusminus sign.12,7 x 6,4 mmmain display,6,3 x 4,2 or3,8 x 2,9 mm auxiliarydisplayKeypad with42 softkeysSee oppositeMetric/InchconversionPRESET functionfor entering agiven value.Acoustic signal.00760216Manual or automatictriggering of data transfer.Output of predefined reportswith headings in 5 languages(plus a programmable one)using an external printer unit(A4 format).BidirectionalRS 232, optoelectronic andCentronicsViaTESA MICRO-HITEplus M1D Control PanelIncludes a part programme for one-dimensional measurement.Also used for parallelism and runout inspection.0,0001 / 0,001 mm0.00001 / 0.0001 in00760221IP50(IEC 60529) Declarationof conformityTESA POWER PANEL plus MIncludes a part programme for one or two-dimensional measurement. Captures flatness, parallelism and run-out deviations. Measures any deviation in perpendicularity or straightness. Executes angle measurement. Allows value input through both the keypad and digital value sensor. Enables automatic programming of the measurement cycles inTeach-in mode. Up to 9999 features distributed in several partprogrammes (each including max. 999 values) can be stored inthe memory. Memory capacity for up to 25 000 measured values. Provides SPC capability with output of mean value, range,standard deviation, histogram, comparison nominal value/actualvalue, number of out-of-tolerance values, control limits, controlcharts. Prints reports in A4 format with related tables and graphics.Creates tailor-made headings to suit Users’ needs.0,0001 / 0,001 / 0,01 mm0.00001 / 0.0001 / 0.001 in00760220TESA POWER PANEL plus Mwith built-in printerIdentical to item No 00760221, but with integrated matrix print forresult output.Optional accessory for TESA Power Panel plus M with built-in printer04765008Thermal paper roll, 57 mm wideM-17
HEIGHT GAUGESOptional Accessories forTESA MICRO-HITE 350 / 600 / 900TESA MICRO-HITE plus M 350 / 600 / 900equipped with Power Panel plus MOptional Accessories FactorystandardFor additional optional accessories, see on page M-26.Shippingpackaging00760140TESA IG-13 probe setConsisting of:007601391 TESA IG-13 digital probe13 mm/0.51 in00760138131 µm0,45 N at zero0,75 N at stop1 TESA IG-13 ft lever for the measuring bolt10 mm long extension for the probe insertConnecting cable IG-13/Power Panel plus M (1 m)116,3Angle of theregression lineX1 0.068:RegressionlineDeviation instraightnessL2 (Z2) 21.9L1 (Z1) 221.4L(Z) 250HighestpositivedeviationX2 -0.023:Highestnegativedeviation00Deviation inperpendicularityInitial valueS07020086 TESA MEMOTAST-special73Consisting of:ø2ø6251 TESA MEMOTAST auxiliary probe along withprobe holder, order No S07072076. Technicaldata are valid for use of this probe mountedon TESA MICRO-HITE 10, 11 or 12.0,5 N20M-18(3 3 L) µmL in m 3 µm
TESA MICRO-HITE 350 / 600 / 900 main gauges Factory standard Measuring span, application range and accuracy as stated on page M-12 Rugged nickel plated base with bottom face including 3 resting points finely lapped Air cushion usable for easy move of the height gauge over the surface plate, if so. Frontal, model 350 7µm, model 600 9µm .
TESA-HITE Magna 8 870 1095 TESA-HITE 2,5 4L 870 1095 TESA-HITE plus M 2,5 3L 860 1085 TESA MICRO-HITE 2 3L 1075 1300 TESA MICRO-HITE plus M 1,9 1,5L 1075 1300 TESA-µHITE 1 or 2 160 360
HEIGHT GAGES HEIGHT GAGES. M-19. MICRO-HITE 350/600/900 Height Gage Sets . 00790033 TESA MICRO-HITE Height Gage Set 350/14 00790034 TESA MICRO-HITE Height Gage Set 600/24 . Individual Accessories, probes and holders are available through your local Brown & Sharpe distributor.
TESA MICRO-HITE manual 350/600/900, the reference for over 20 years! W 5290 W 5790 W 8790. 2 SW ISS MADE Vernier calipers . – 2-point contact gauge for bore measurement . TESA Height Gauges, the reference for over 30 years ! W 3690 W 3190 W 4690 W 850 W 5340 W 5640 W 8440 W 4290 W 2240 W 2640. 11 SW
MICRO-ETALON 225 MICROMETER WITH DIAL INDICATOR 75 70 01 1DIV .0001'' 0 5.1 in .001 in.0001 in .005 in Starting at 1,220 350 00881900 599-281-32. 8 EAON ANFACTRIN INTELLIENCE TESA Techoogy HexagonMI.com TESAtechnology.com TESAtechnology.com HexagonMI.com TESA Techoogy EAON ANFACTRIN INTELLIENCE 9 BROWN & SHARPE VALUELINE .
To learn more about how Brown & Sharpe height gages can add a new dimension to your measuring . The speed of a manual height gage combined with the precision of a motorized height gage. TESA MICRO-HITE Motorized . M 350 14 in/ 365 mm 20 in/520 mm 29 in/745 mm 0.0001 0.0000015 L/2 1.5 L 0.000025 in/ 0.5µm
Weight R5V 2-port [kg] 4.0 4.6 5.9 — R5V 3-port [kg] 3.6 4.6 5.2 8.0 Hydraulic Max. operating pressure [bar] SAE61 Ports A, B 350 350 280 210 Port Y1 30 30 30 30 SAE62 Ports A, B 350 350 350 350 Port Y1 30 30 30 30 Pressure stages [bar] 105, 210, 350 Nominal flow [l/min] 90 300 600 600 Fluid Hydraulic oil according to DIN 51524
603.05 Welded Wire Fabric 600-3 604 CONSTRUCTION JOINTS 600-4 605 DEPOSITING THE CONCRETE 600-4 606 CONSOLIDATING CONCRETE 600-4 607 CURING 600-5 607.01 General 600-5 607.02 Cold Weather Requirements 600-6 608 REMOVAL OF FORMS 600-6 609 CONCRETE SURFACE FINISHES 600-6 609.01 Filling and Repairing Bolt Holes 600-8
2nd Grade – Launching with . Voices in the Park by Anthony Browne (lead from the Third Voice) My First Tooth is Gone by student (student authored work from Common Core Student Work Samples) A Chair for my Mother by Vera B. William Moonlight on the River by Robert McCloskey One Morning in Maine by Robert McCloskey, Roach by Kathy (student authored work from www.readingandwritingproject.com .


